A practical example of product management
I’ve written before about what I think product management is, but to be concise, it’s simply: “get the job done.”
Today I want to write about what that actually looks like in practice.
For EarnLocal, we needed a waitlist for Merchants. A waitlist allowed us to verify the identity of Merchants - and their ownership of a business - before they could fully utilize the platform.
So what does building out a feature like this entail?
1. Brainstorm the business logic #
How does a Merchant actually go about verifying their business?
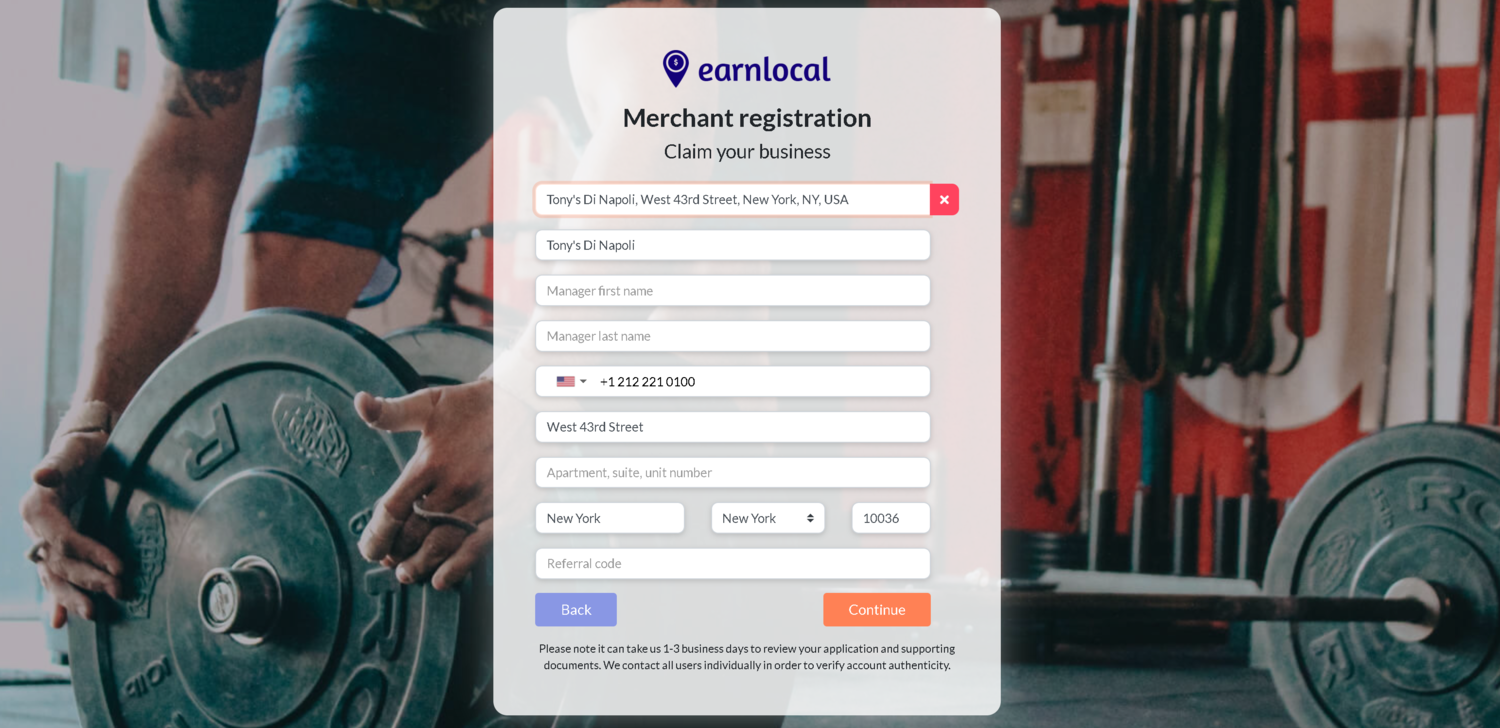
First, they need to search for their business. EarnLocal interfaces with the Google Places API on the backend, which allows Merchants to look up their business and create an account for it.
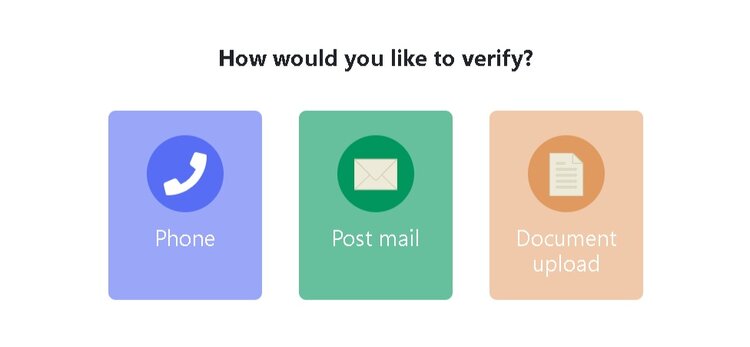
What would constitute verification? What is the workflow here?
- We could call them, but we’d have to make sure to only call the number provided by Google Places, not whatever number the Merchant provides to us upon registration;
- We could send them a physical piece of post mail; or
- We could request they upload proof of ownership (e.g. legal documents, utility bills, etc.).
Generally when performing verification, you need to include some kind of verification code over the verification channel (e.g. phone, post mail). After the Merchant receives this code, they provide it back to EarnLocal in order to verify their account. (This is similar to how you verify your Google My Business account.)
This means we needed to produce a verification code, then persist it in the database. As a result, we needed add MerchantClaimRequests to our data model: each request made by a Merchant would be associated with a certain verification code.
The idea of allowing multiple MerchantClaimRequests is an important one. What if, for example, the Merchant forgets the verification code, or never receives it in the mail? We need to give the Merchant an option to request another verification code, if necessary.
If a Merchant logs into EarnLocal a week later and forgets whether or not they requested a verification code, we should have some way of telling them they did already. Each Entity (the business they’re claiming), then, should have a status:
- Is the Entity “claimable” (i.e. not claimed by another Merchant already?)
- Is the Entity “pending” (i.e. already requested by this Merchant?)
- Is the Entity “claimed” (i.e. they’ve already verified ownership, nothing else to do here)
Successful MerchantClaimRequests should be able to change the status of a business Entity. If a MerchantClaimRequest is approved – the verification was successful - then ownership of that Entity should now belong to that Merchant account.
The status should show CLAIMED for the Merchant who verified ownership, and ALREADY_CLAIMED for everyone else.
Finally, we need to include email notifications. If a new Merchant claims their business, there are two emails that are submitted: one to Staff (letting us know there’s something to review), and one to the Merchant (letting them know we received their request).
2. Formalize the requirements #
Before we start doing any design or coding, we need to a bit of strategic planning. I’ve listed out some of the questions in this post, but generally speaking we want to cover our bases on new feature development. For example:
- Is this worth developing? How urgent is it?
- How complex is it? How long will it take?
- What is the simplest, minimally viable version we can produce?
- Who do we need to check with (e.g. legal, operations, customer support)?
- Who will do the work? Who will maintain it?
All of these questions will form the basis of a requirements document (sometimes called the “specifications”). A requirements document specifies, in written form, all the things we should be considering in order to get the feature done.
Sometimes, in the early stages, a requirements document will eventually discover that it’s not worth doing the feature at all. That’s okay too.
We used Nuclino to draft our requirements, but any knowledgebase or wiki software is suitable as well (e.g. Confluence, Google Docs).
A requirements document is not a one-and-done item. It’s constantly updated as you collect feedback from engineers, designers, customer support and other stakeholders. Plans change all the time, and so should the requirements documents.
While this differs by organization, our requirements tended to have several main parts:
- Business logic: how does the feature actually work?
- Data model: what objects do we need stored in the database?
- API design: how are these objects exposed to the frontend?
- UI design: what does the UI look like and which parts are interactive?
- Unit tests: what automated tests should we include with this feature?
- Task list: an ordered list of who is doing what, by when (e.g. backend, frontend, QA)
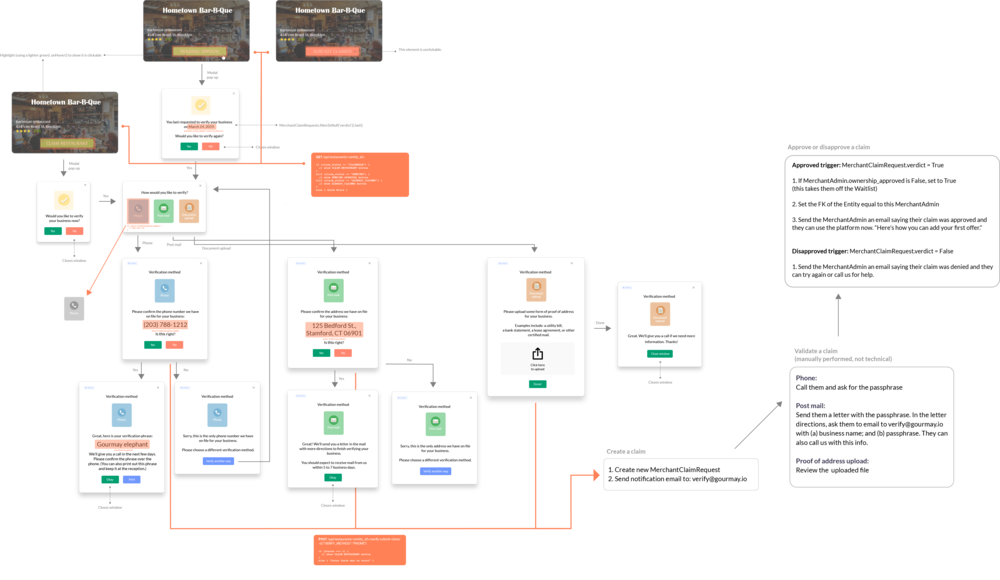
Here’s what an example of that looks like:
3. Design #
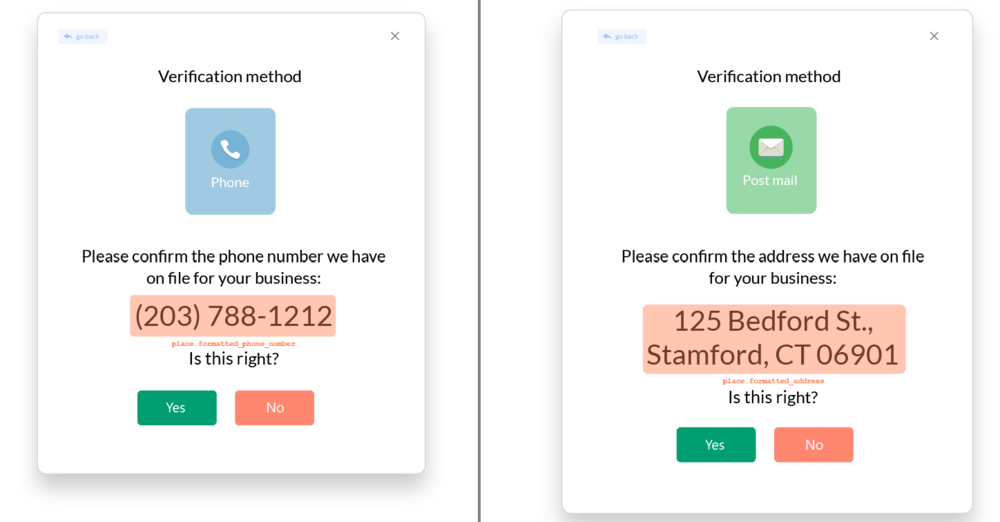
After we determined all the different ways a Merchant might use the verification feature, we needed to build the actual user interface. In other words, what are all the screens, workflows and buttons that a Merchant will encounter while verifying ownership of their business?
Inevitably when you do the actual design, things come up that you didn’t plan for in the business logic. The business logic is fairly abstract: “how should this work in theory?” The design, on the other hand, is: “how does this actually work in practice?”
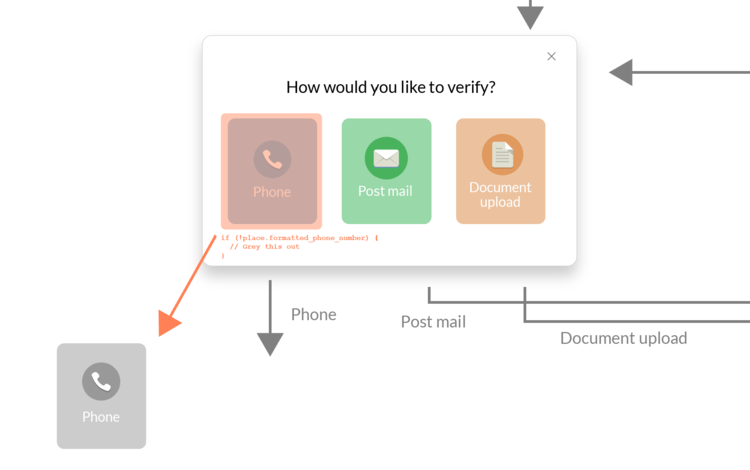
For example, what if a Merchant chooses to verify by phone, but it turns out that Google Places doesn’t have a phone number listed for that Merchant? In that case, we need to deactivate and gray out the button so that the Merchant can’t choose it.
Typically when you do the design, you need to also include all the text that accompanies it. The text is perhaps just as important as the design itself: if there are a bunch of fancy icons but no explanation on how anything works, the user will undoubtedly get confused.
Sometimes you need to be verbose in your explanations, but you also don’t want users always encountering a wall of text for everything they do. For that reason, we included dozens of tool tips throughout our designs: if a user wants to learn more, they simply hover over the question mark and get the complete explanation.

4. Backend development #
By this point, we’ve developed a high-level understanding of what’s required to implement the verification feature (“the business logic”). We’ve also done the user interface (“design”), which is especially important in precisely describing the workflow and yielding additional steps we hadn’t thought of previously.
Now it’s time to brainstorm what’s required on the backend. This involves 3 parts:
- The data model
- The API design
- The business logic
The data model is about thinking in terms of “entities” or “objects” and how they relate to one another. Can Merchants, for example, create many MerchantClaimRequests? That’s a ManyToMany (N:N) relationship.
What fields should a MerchantClaimRequest have? What data types should they be? Even though the backend engineer should give input into all of these, the technical product manager should generally be able to draft what the data model will look like.
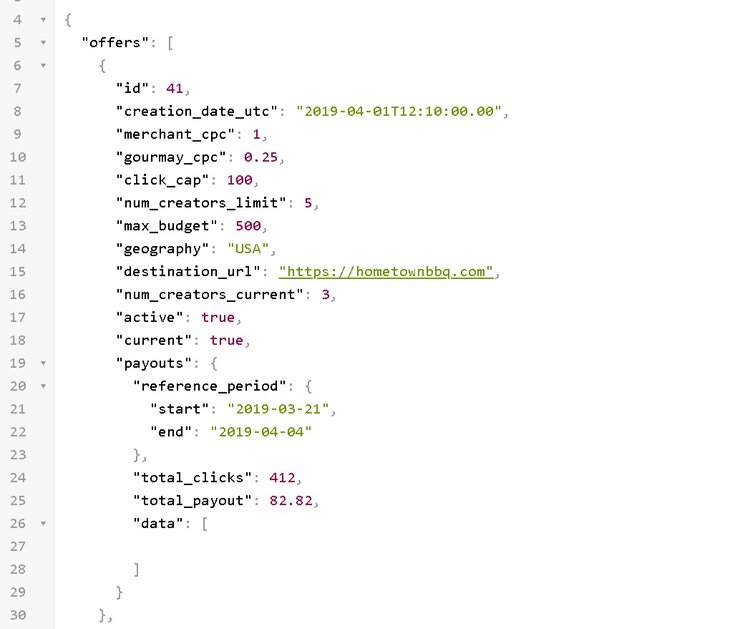
Next is the REST API design. The frontend application will need to populate data to present to the end user, and it does so by consuming and sending data to the backend API.
REST stands for “representational state transfer”, which is a fancy way of saying that there is persisted database data (“state”), which may be transferred to the user in a variety of ways (“representations”). In practice, this means making data from the database available at URL endpoint.
We used MockAPI to produce live data for the frontend to consume before any backend coding has occurred. This way, we can specify which data fields should be displayed, what data types they should be, and where they should be accessible (i.e. the APIs).
Finally, there’s the business logic (sometimes called the “view logic”). The business logic is what actually executes on the backend when the frontend interfaces with an API.
For example, do we have to send an email notification after a certain event occurs? If so, do we have to integrate with an email service provider (an “ESP”), like SendGrid or Mandrill?
Generally speaking, I didn’t go too deep into the details when drafting business logic. Presumably that’s what a backend developer knows how to do: actually implement what’s required.
But I did often bullet out the major logical steps and asked our backend developer to review them, just in case something would be more complicated than I imagined.
5. Frontend development #
Once we completed the APIs, we know what data will be available to the frontend application, and where it will be.
From the frontend developers point of view (that is, the person actually creating the HTML, CSS and JavaScript), you know have (a) the UI mockups and (b) the APIs.
But, you don’t have how these two connect!
In other words, the UI mockups show what the interface should look like, and the APIs offer data to the interface, but nothing so far shows which data fields should go where on the UI.
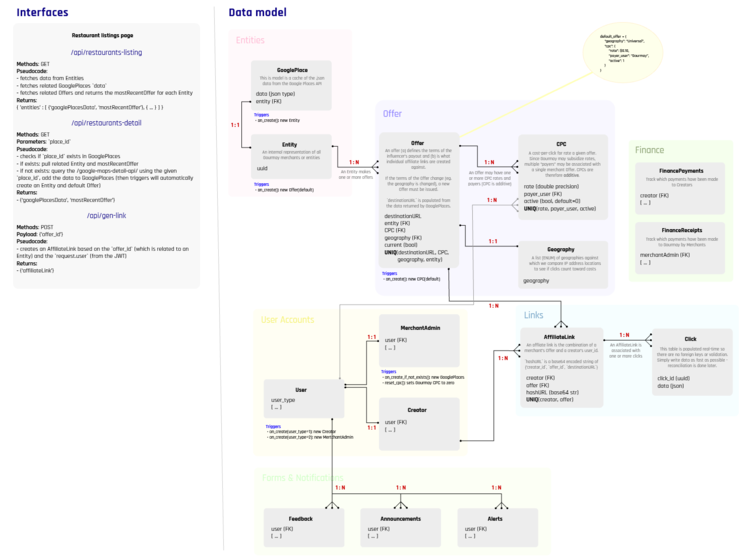
A product manager, who sits at the intersection of engineers and designers, refines the UI designs with data from the APIs. Here’s what it looks like:
As you can see, we decided to encode in orange the dynamic fields on the user interface. If there wasn’t an orange highlight, the frontend dev didn’t have to worry about updating the design. But, if there was an orange highlight, this meant the UI would either update based on data from the API, or accept user input which sent data to an API.
In practice, this involved marking up on the UI designs exactly which fields from the APIs would populate certain parts of the API design.
Finally, there’s sometimes a bit of frontend logic we need to plan for. If there’s a Back button, this doesn’t have anything to do with the backend, but the frontend needs to update the screen accordingly. If there’s a console error or an API error, the frontend needs to show the right error, in non-computer-speak, to the user.
6. Execute #
Even after all of this, the role of the product manager isn’t quite done. The product manager has thus far developed a strategic plan for exactly what will be developed, why, how, by when and by whom.
But, the work still has to be done, and the product manager is responsible for making sure it gets done.
This involves:
- Breaking up the work up into a manageable task queue for developers and designers (often using Jira, Basecamp or Asana)
- Communicating with everyone on questions that come up, as well as next steps (often via email or Slack)
- Performing quality assurance: does the end-product conform to the requirements as specified by the product manager?
The best way to think about a product manager’s role during execution is “removing frictions.” If a frontend engineer has a question about how a design should be implemented, or a designer has a question about what data they’ll be displaying, the product manager should be able to answer. If the requirements documents aren’t clear, they should be updated accordingly.
A lot of this comes down to keeping everyone on the same page. That involves substantial communication and understanding what bottlenecks people are running into.
It also involves a lot of work that is not strictly within the purview of others. Should a frontend engineer really be configuring permissions on AWS or Heroku or DigitalOcean? Should a backend developer really be managing SSL and DNS for a new domain name? This is stuff that the product manager tends to do.
And in the end, it’s all this little things that add up to getting the product out the door.